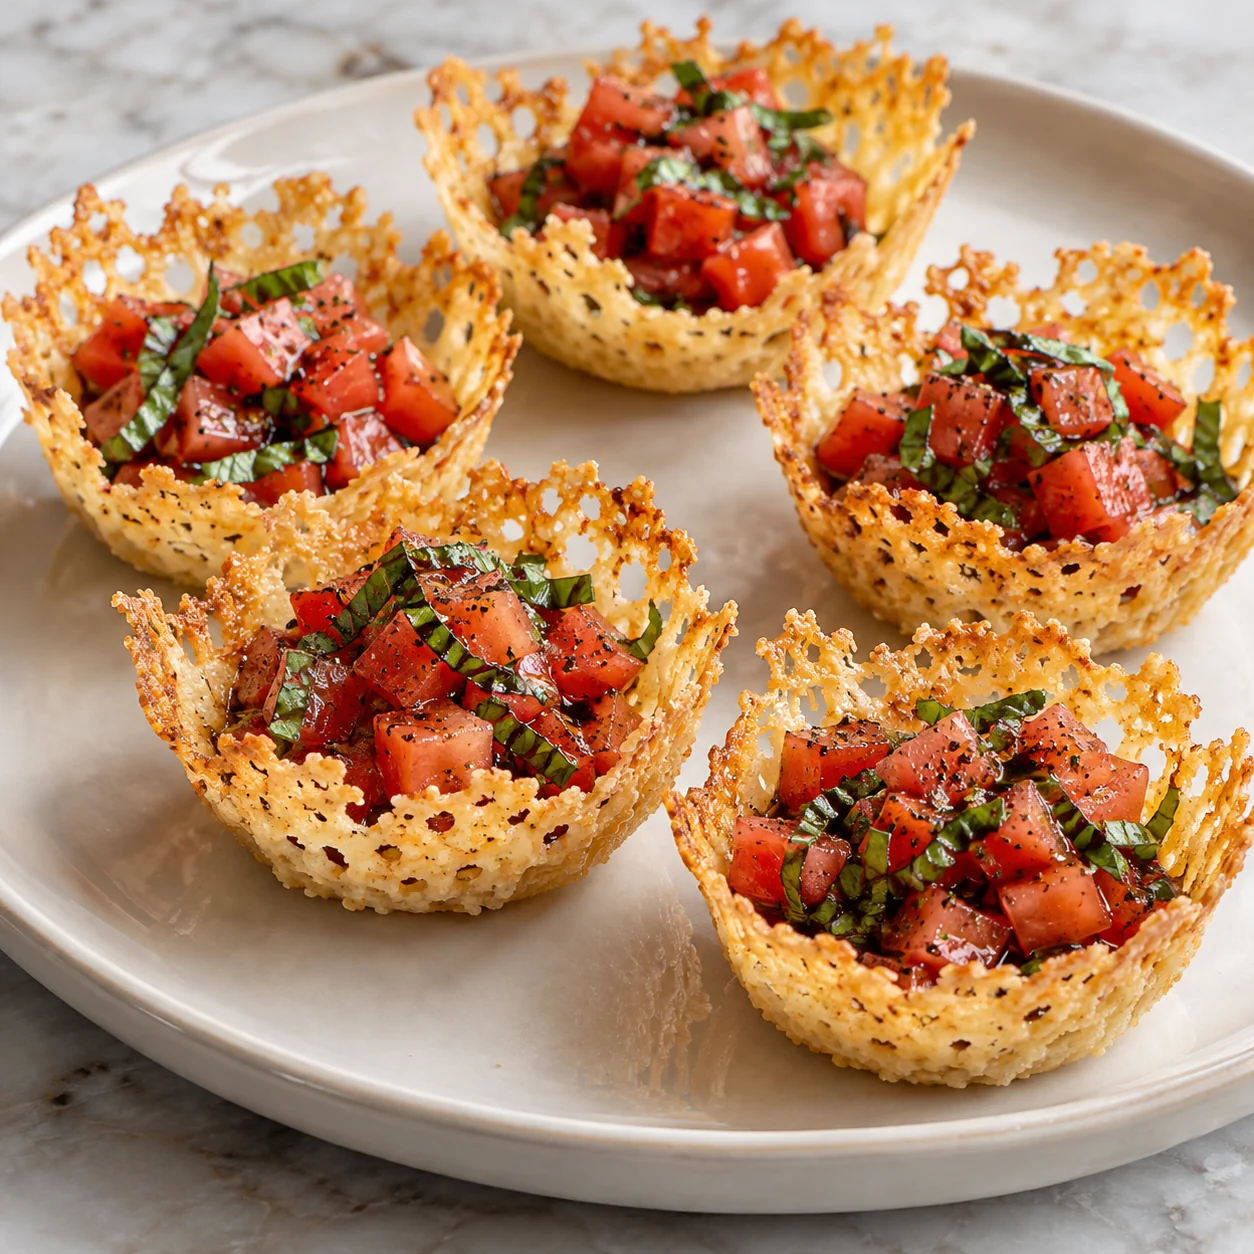
A frico cup is a thin cheese crisp shaped while warm, then allowed to harden around a mold. It gives a small tomato salad an edible shell without pastry dough. The full recipe makes six filled cups, one per serving, in about forty-five minutes. Have the shaping molds ready before baking because the useful window between flexible cheese and brittle crisp is short.
Parmesan frico cups with tomato salad makes 6 servings, with 45 min estimated total time. View the standalone recipe page.
Choose a hard cheese and grate it finely
Use a hard Parmesan-style cheese that can be finely grated from a block. For the vegetarian label, confirm microbial or vegetable rennet with the producer; traditional protected-origin Parmesan commonly uses animal rennet. The generic hard-cheese nutrition profile remains an estimate for the actual product selected. Fine fresh shreds distribute more evenly than thick curls. Epicurious's frico guidance also emphasizes freshly shredded cheese and shaping it while warm. This version uses cheese alone for the shell, without flour, and a tomato filling rather than the creamy filling in that source.
Make evenly thin circles on a silicone mat
Weigh six twenty-gram cheese portions before spreading them. Work with three circles per batch so shaping does not become a race with six cooling discs at once. Spread each portion into a four-inch circle, keeping the layer even while allowing small lacy gaps. A thick pile in the center stays chewy while a very sparse outer edge can burn. Leave room between the circles because the cheese spreads as it melts. Set inverted small heatproof ramekins or muffin-cup molds nearby on a stable surface, with a thin spatula ready to lift the discs.
Watch the final minute of baking closely
Bake at 375°F / 190°C for five to seven minutes. Look for melted cheese that has become evenly golden, not merely a ring of brown around a pale unmelted center. Small differences in shred size and tray material can change the timing. Stay by the oven near the end because cheese can move from gold to bitter dark brown quickly. Remove the tray and wait about twenty to thirty seconds before lifting. That brief pause lets the bubbling surface settle while the disc remains flexible enough to bend without breaking.
Drape gently and let the cup become firm
Slide the spatula fully under a warm disc so it is supported during lifting. Place it over an inverted mold, then ease the sides down using the spatula rather than bare fingers against hot cheese. Do not force deep sharp folds; a shallow scalloped cup is easier to fill and less likely to crack. Let it cool on the mold for at least five minutes before lifting it off. If a disc becomes rigid before shaping, return it briefly to the oven to soften. Repeat the second batch after the first cups are safely set aside.
Keep the tomato salad separate until serving
Dice the tomatoes finely and retain their juices. Combine them with chopped basil, the measured oil, vinegar and pepper. Stir just before portioning so all six cups receive some dressing rather than leaving a concentrated puddle in the bowl. Fill immediately before serving: moisture softens cheese lace, so these are not designed to sit dressed on a buffet for hours. The estimate includes all cheese and dressing, even if small amounts remain on the mat. Refrigerate leftover salad promptly in a covered container and keep any unfilled shells separate so they do not absorb the tomato liquid.
Common questions
Why did my cup crack?
The disc may have cooled too far, or the cheese layer may have been uneven. Lift while flexible, support the full disc with the spatula and drape gently. Very thin broken crisps can still be served alongside salad, but no longer count as intact cups.
Are packaged cheese shreds interchangeable?
Their coatings, moisture and shred size vary. Freshly grating a suitable hard cheese gives more control. Check labels for gluten-containing additions and confirm rennet if using the vegetarian classification.
Technique & food-safety references
These primary references support the technique, safety and storage guidance. The recipe and cooking explanations are original Recipe Pinboard content.